2010年5月5日

(3) Miso soup


Miso soup is the most basic cuisine in Japan. It’s not only delicious but also good for health. Miso is made from soybean, which has lots of nutrition. It also stimulates metabolism, which means that it’s helpful when you need to go on a diet. Besides, it assists body with exhausting harmful remains. Above all are partly the reasons why most of Japanese stay in good shapes and live a long life.


The recipe is very simple and the ingredients are very common. The most interesting part of it is that you can add ingredients you like, such as tofu, fish, pork or vegetables. In Japan, people sometimes cook miso soup with a variety of ingredients and have it and rice as a meal.
Miso can be divided into many categories, such as red miso, white miso, soy sauce miso, and so on. Every kind has different flavors and advantages. Nevertheless, they all have one thing in common, which is that they are not appropriate to heating for a long time, or the fragrance will disappear.

Steps:
1. Prepare the ingredients you like and cut them into mouthful cubes. Tofu, green onion is the basic. Pork with vegetables or fish with kelp is recommended.
2. Boil a pan of water. If you ingredients are not easily to become cooked, such as clams, radish, fish, and meat, remember to put them directly after water boils and before it’s done, mix miso into the pan. However, if your ingredients are easily cooked, such as tofu and vegetables, you can add miso ahead then put the ingredients. The point is that don’t cook miso for a long time.
3. During the time that waiting for the second boil, never turn the flame to high. After it boils and all the ingredients are cooked, this soup can be perfectly served.


I like to add noodle or rice in the finished product and it can be an easy and delicious meal.


When you get familiar to this cuisine and the specialties of miso, you can make some changes. For example, add lot ingredients and more water and turn it into a chafing dish; or mix two different kinds of miso making the flavor of finished product more amazing and deep. The rest of miso can be use in a variety typrs of cuisines, such as the dressing or paste on roasted fish, pork, or lumps of rice.

Except some patient and practice, it's really not difficult.

(2) Sweet red bean soup


Sweet red bean soup is the most common dessert in my family. There’s a famous sweet soup store near my home in Tainan, and I love its sweet red bean and green bean soup a lot since I was still studied in high school. I think the reason why I love it so much is because that it’s not only delicious but also partly my precious memory of hometown and simplicity.


The first one in my family decided to try to make the sweet soup himself is my father because he was recalcitrant and believed that he can also make red bean soup which is as perfect as the one sold in store. As a result, he bought a pack of red beans and started his experiments. During that time, we made and tasted it together. Although in the end the person who made it successfully was my mother, my father insisted that he was an important and essential assistant. However, no matter who was the person who made the soup, this dessert already become part of my family memories.


Actually this dessert is easy to make and good for health. Red beans contain lots of vitamin B and minerals. Green beans, in Chinese medicine, can reduce the accumulated poison and exhaust bad air in the body. Both of them are good for human and appropriate to hot summer.

Steps:

1. Wash the beans and pick up the bad or small one. Add water in a pan, the height of it should cover over the beans, and heat it by high flame until it boil.
2. After it boils, pour a cup of water and wait for boil again. Then discard all the soup in order to eliminate the dirt and mouth-puckering taste.
3. Pour water in it. The ratio of beans and water is 1:4 or 1:5(at your will). Heat it at high flame. When it boils, turn to low flame.
4. Keep stewing it. When the central part of bean starts to soften, add sugar. Then you can adjust the amount of sugar and decide the soften degree by yourself during the process.

This recipe is different from those traditional one, we don’t have to dip the beans for hours and, in fact, omit this step will preserve the fragrance and flavor of beans. You can add other ingredients like sweet potatoes, Job’s tears, or oats. No matter eat it when it’s still hot or become cool is really an enjoyment.

(1) Taiwanese style cucumber pickle


Every time I go to a Chinese restaurant or noodle diner, I always expect whether it has cold cucumber pickles as a side dish. It is special and filled of nostalgic old Taiwanese flavor. Although every experienced cooker will say that it’s easy to make, for normal people as me it’s hard to keep a steady quality and good taste.


Each restaurant has delicate differences. In my opinion, the best way to find a best recipe is to try yourself because everyone has dissimilar preference. As a result, I provide a most prevailed one and the advantages of it Is that it’s easy to make and adjust.

Steps:

1. Wash cucumbers carefully because they often have lots of insecticides remains. Cut them into cubes and use the back of a blade to pound them. This step helps the pickle get flavor efficiently and well.


2. Sprinkle some sugar giving them stirring, and then add salt repeating the same step. Add sugar before salt can prevent cucumbers from losing too many water, which attributes to the sense of crisp. Wait for 30 minutes, pour out the exhausted water. (You can also preserve it if you can accept the flavor.)


3. Add vinegar and sugar, the proportion is 1:1. Adjust the amount according to the number of your cucumbers. If you like heavier flavor, pound and add some garlic and chili is a good choice. Cover the container then put it into refrigerator for 1 to 2 hours. During the process, stir it casually and taste it, thus you can adjust the flavor immediately.

It’s a flexible dish. You can decide whether to eat or to adjust the flavor at any time and at your will. Besides, put it in the freeze zone of refrigerator is a novel and amazing choice in summer because there will be some ice chips around the cucumbers. Moreover, you can change cucumber into cabbage or onion, they also become delicious under this recipe.

2010年1月7日

Chocolate Ganache

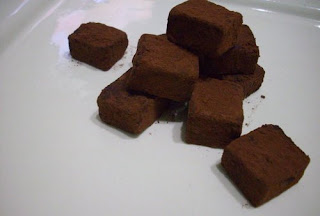
Ganache is the name of a kind of approach which means adding whipped cream (and other ingredients you like) in chocolate, and it is widely used in nama chocolate, truffles, stuffing, and paste. Nama chocolate is from Japan and the word ”nama” signifies “fresh”. Chocolate Ganache has many specialties. For example, the quality of the chocolate is very soft, smooth and easy-melted. It emphasizes the original taste of chocolate and that’s also why this dessert is so wide-spread.


Last week I went home and made this dessert with my younger sister, and I found that it was not as difficult as I had thought before.

The basic ingredients are only chocolate and whipped cream but you can add some sugar, nut, wine, tea, or something. It's up to you. The ratio of chocollate and whipped cream is 1:1 and if you want your ganache softer, you can change the propotion to 1:1.2.

First, mince the chocolate and put it aside in reserve. Heat whipped cream and don't make it boil. Formal recipe has strict limits toward the temperature of all the ingredients and the environment, but in here I just make the cream hot without measuring the real temperature.


Turn off the stove, and put chocolate into the whipped cream. Cover the chocolate with cream as possible as you can.

Next, leave it alone for three minutes. It is said that this is a crucial step which determine the flavor of ganache.


After three minutes, stir the mixture in the same direction until its thickness looks like mayonnaise (美乃滋). When the mixture blend well, pour it into models.


The last step is to place it in the refrigerator, and dice it after chocolate becomes solid. The white parts are cooking paper, it prevents ganache from sticking to the model.


If you have cocoa powder, sprinkle some on the finished product because the powder not only makes it tasty but also prolong the expiration date.


Most surprisingly was that when my sister and I shared the chocolate with my "desserts-resistant" Mom, she also loved this dessert!


pot stickers (pan-fried dumplings)

I believe that almost everyone, especially students, has a packet of dumplings in the refrigerator for it's really convenient. Whenever you're hungry, a plate of hot dumplings will be served within minutes. Besides, freezing dumplings are not only easy to buy but also very cheap in Taiwan. The best of all is that although there are a variety of stuffings, poaching them doesn't take you any efforts and skills.

As a result, I have a packet of dumplings, too. However, only poaching is a little bit boring and flat. Therefore, I decide to chllange cooking pot stickers. Coincidentally the articles in this blog are only about desserts so far and it's time to do something different.

Actually I had tried to make this dish several times before and unfortunately, what I got was either a plate of poor broken dumplings or a miserable dirty pan. After these experiences, I find that a good stainless pan and some common and influential tips will help you a lot. Please don't use cheap or bad pan or you will definitely go mad.


First of all, get some dumplings from your refrigerator and give them five minutes to "warm up." Because of the ice which adheres to the surface of dumplings will melt into water if you put them into pan directly and it makes your dumplings stick to the pan. (It will drive you crazy when washing the pan.)

At the same time pour some oil into the pan and turn the stove to low flame. The quantity of oil depends on whether your pan is stainless or not.


Line up the dumplings and remember to keep some distances between each other for they will inflate later. Make sure that every dumpling is stained with oil. Then turn the stove to medium flame until the surface of every dumpling become gold and crunchy.


Take a bowl and pour water in it, and add some flour. The flour-water doesn't have to be thick. Pour the mixture into the pan and it should flow one third of the height of dumplings.


Next, cover the pan and turn the stove to low flame. Waiting for ten to fifteen minutes (it depends on the size of your dumplings) and the dish is finished! I recommend you to shovel them instead of using chopsticks.


Pot stickers smell and taste good and amazingly, the number of the dumplings which makes me full is lower than poached dumplings.

2009年12月28日

grape jam


Couple days ago I went home in Tainan and my Mom gave me two bunches of grapes. I ate one of them, however grapes are easily ripe. When I was thinking about how to prevent wasting the rest bunch, which was stayed in the fridge for a long time, suddenly I recalled the scene that my younger sister and I had toast and jam for dessert in our childhood. These grapes were too ripe to eat directly so there is no difference between being discarded straightly and being discarded after becoming a bowl of terrible jam. Thinking of it, I decided to buy sugar happily.

I was a little bit afraid of it for it’s my first time making jam. Therefore, I surfed the Internet ahead and chose several of recipes. I found that actually it’s not as difficult as I thought before.


In my opinion, this recipe is the easiest and most efficient one to those people who don’t have so much time and a good pan.


I photographed these pictures by my cellphone. I'm sorry for the poor quality.


First, wash the grapes and cut them half. I cube a small amount of apple into it for there is almost no pectin in grapes. If there’s no pectin, your jam will look like liquid instead of jelly.


And then add sugar, the ratio of grape to sugar is 4:1. Nevertheless, you don’t have to worry too much or measure them accurately for you still can add sugar later. Put them in an airtight food container and set it in a fridge for one day.


After one day, you can see that in the picture, there will be some water came out from grapes.


Put all of them into a pan and heat it on medium flame and once it boils, turn down the stove to low flame. Keep stew the jam until you satisfy with the consistency.

Cool it at the room temperature and then seal it in a bottle (made by glass is recommended) in a fridge.


It’s really easy and you only have to pay attention to the process of stew the jam.

The product is much better, safer and healthier than most of jams sold in supermarkets and stores.


steamed custard stuffed bun

Actually I have a problem translating the name of this dessert for it’s a Chinese dish. You can see this dessert in many Hong Kong restaurants and we often call it “奶皇包” in Chinese. Traditional recipe is very troublesome and has high Calories for the stuffing always contains lots of unnecessary fat and sugar.

In this recipe I still use waffle/pancake powder as one of the articles before which introduced the approach to dorayaki. (The pancake powder is really very very very convenient.) Besides, formal bun’s stuffing is usually made of egg yolk, whipped cream, and sometimes even green bean paste. I choose the custard I made before to substitute for the traditional one so that we can save more time and reduce the possibility of failure.


This time I want to make “dough” so I add water (you can replace it with milk or soymilk as you like, and the smell will change with your liquid) slowly while kneading the powder (about 150 ml). You can see the powder becomes dough gradually. Don’t add all of the water at a time, this step needs you to be patient and tender.

Wrap the dough with food wrap and place it aside for 20 minutes. However, it won’t inflate for there’s no yeast. Because of baking powder and flour, the dough will be much brighter and softer.

Make the dough a strip and divide it into four equal parts. Knead each part to the shape of ball and then roll them into slices, but remember the depth of the middle should be thicker than the rest of the circle.


Put cooled custard in the middle of the slice and wrap it. After four buns are formed, steam them on high flame for ten minutes.


It the best time to eat them when they just come out from the pan. Pay attention to the delicious and hot stuffing! (However, this is one of the joyfulness of eating it.)